I always try to eat delicious food. Unfortunately I don't have that much money, so I have to cook a lot of it at home. But thats OK because I love cooking and I love eating at home with my wife. This is a website with my favorite recipes and a little bit of commentary.

Monday, May 26, 2008

Cuisine at Home Beef Stroganoff

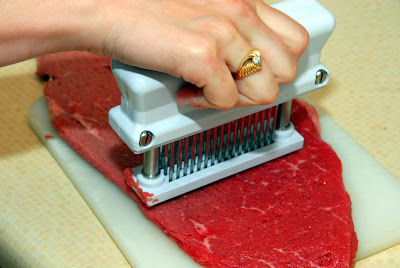
My favorite cooking magazine is published in Des Moines. If you want to take your cooking to the next level you should subscribe to Cuisine at Home or at least buy a copy in the book store. My wife spotted a recipe for Beef Stroganoff that makes use of minute steak. Readers know my fondness for the simple cheap meat. Cuisine at Home shows how to make your own cube steak using a special tenderizer. This recipe for stroganoff is awesome. My wife thinks you should mix the sour cream in with everything at the end instead of serving it on top. She also likes the mushrooms cut in half and the big chunks of meat. I like the taste of the sauce a little better in the Gourmet Cookbook version but I like the meat and mushrooms better in this version. Perhaps a hybrid recipe is in order!

Beef Stroganoff

1 boneless arm roast, tenderized and cut into 2 inch cubes

All purpose flour

2T vegetable oil

If using an arm or other beef roast cut in two lengthwise and tenderize both strips. Season with salt and pepper. Dredge in flour and sear well in the vegetable oil. Set aside.

2c button mushrooms

2c cremini mushrooms

1T unsalted butter

2c diced onion

1T tomato paste

Sauté mushrooms in butter until golden. Remove from the pan. Add the onion and tomato paste and sauté.

½ c dry sherry

½ c chicken broth

½ c beef broth

Deglaze the pan with the sherry and simmer until most of the liquid has evaporated. Add the broths and return the beef to the pan. Cover and braise in a 325 degree oven for 45 minutes. Add the mushrooms and continue to braise another 15 minutes. Prepare egg noodles according to the package directions. Top each serving with dilled sour cream by combining 1c sour cream with 4T chopped fresh dill.

Ye Olde Tenderizing Process
And now for the food shot

Sunday, May 25, 2008

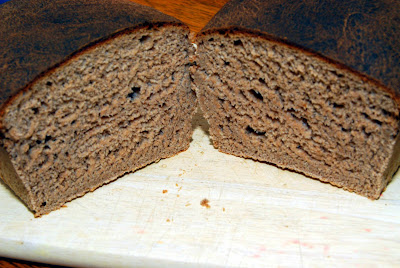
Kind-of-Sourdough Whole Wheat Bread

I just got Peter Reinhart's latest book Whole Grain Breads. It was published in August 2007 but I just found out about it a week ago.

He has been experimenting with ways to make whole grain breads that people actually want to eat. He has come up with some new techniques that make less dense whole grain breads that have sweeter and more complex flavors. He also presents many traditional breads from different countries.

I decided to start with the first recipe in the book - whole wheat sandwich bread. We eat whole wheat bread almost exclusively so it seemed like a perfect formula to try. A very intriguing aspect of this formula is that he uses both a wild yeast starter and some instant yeast.

Also in this recipe he adapts his cold preferment technique used in his baguette recipe to instead be soaked at room temperature without yeast. He reasons that soaking the flour will develop flavor but there is no reason to add the yeast. If you don't add the yeast you don't have to refrigerate the dough. I experimented in using refrigerated pre-ferments to make pizza so I was very interested in this new concept. He calls it a 'soaker'.

He also combines some barm (see below) with whole wheat flour to make a starter. Using a wild yeasted barm adds a more complex and slightly sourdough flavor to the finished bread.

Both the soaker and the starter sit overnight. The next day those 2 parts are combined with a few ingredients to make the final dough. By adding yeast to the final dough it produces a more predictable and quicker rise time. The fact that this bread is made with starter and commercial yeast makes it a kind-of-sourdough whole wheat bread.

Kind-Of-Sourdough Whole Wheat Bread

makes 1 loaf and takes 2 days

Day 1

Soaker

Combine 1 3/4 cups (8 oz) whole wheat flour with 3/4 cup plus 2 T (7 ounces) scalded milk and 1/2 teaspoon salt in a bowl. Stir until well combined. Cover the bowl with plastic wrap and let sit on the counter overnight, anywhere from 12 to 24 hours.

Wild Yeast Starter

Combine 5 tablespoons (2.25 ounces) of barm with 1 1/2 cups (6 3/4 ounces) whole wheat flour and 1/2 cup plus 2 tablespoons (5 ounces) water at room temperature. Stir until flour is fully hydrated. Let it sit for 5 minutes and then knead it again with wet hands for 1 minute. Cover the bowl with plastic wrap and let sit on the counter for 4 to 6 hours or until doubled in size. Knead the dough for a few seconds to degas it, cover it again and put it in the fridge overnight.

Day 2

Final dough ingredients

Soaker from day 1
starter from day 1 (warmed up to room temperature for an hour)
7 tablespoons (2 ounces) whole wheat flour
5/8 teaspoon salt
2 1/4 teaspoons (1/4 ounce) instant yeast
2 1/4 teaspoons (1.5 ounces) honey
2 T melted butter

Combine all ingredients in the mixer. Mix on low speed for 1 minute to bring all the ingredients together in a ball. Add extra flour as needed to make a slightly sticky dough. Increase mixer speed to medium low and mix for 2 to 3 minutes.

At this point you can use the dough hook to knead the dough for 4 minutes on medium speed or you can knead it by hand for 3 or 4 minutes. Incorporate extra flour as needed so that the dough feels soft and tacky but not sticky. Form the dough into a ball and let it rest on the counter for 5 minutes. Knead for 1 more minute and place it in an oiled bowl covered with plastic wrap. Let it rise for 45 minutes to 1 hour, until it has risen to 1 1/2 times its original size.

Take the risen dough and form it into a loaf. Put it in a greased bread pan. Mist the top of the dough with spray oil and cover with plastic wrap. Let it rise again until 1 1/2 times its original size.

Meanwhile prepare the oven. Place one rack on the bottom and one rack several notches above. Place a cookie sheet on the top rack. Preheat to 425 degrees.

When your dough is ready to bake slide the loaf pan onto the bottom rack and dump 1 cup water into the cookie sheet to create steam. Lower the temperature to 350 degrees, close the door and bake 20 minutes. Rotate the loaf 180 degrees and continue to bake for another 20 to 30 minutes until the loaf is a rich, reddish brown and sounds hollow when thumped. You can use a thermometer to measure the temperature of the bread and it should register at least 195 degrees.

Thursday, May 22, 2008

Basic Sourdough Bread

To make this bread you will need to follow the directions in the post below for creating a sourdough culture and then a sourdough barm. I got this recipe from Peter Reinhart's Bread Baker's Apprentice book. There is a link in the post below if you are interested in purchasing the book.

Basic Sourdough Bread

Makes two 1 1/2 pound loaves.

1) Remove the barm from the refrigerator and measure out 2/3 cup of it into a mixing bowl. Make sure the barm has been refreshed in the last three days. Cover the bowl with plastic wrap and let it warm up for 1 hour.

2) Add 1 cup (4.5 ounces) bread flour to the barm and just enough water (1/8th to 1/4 cup) to make a small ball about the consistency of bread dough. You don't have to mix it very long, just enough to have all the ingredients combined.

3) Cover the bowl with plastic wrap and ferment at room temp for about 4 hours until the starter has doubled in size. Put it in the refrigerator overnight.

4) Remove the dough from step 3 from the fridge and cut into 10 small pieces. Put them in a mixing bowl and cover with plastic wrap. Let them warm up for 1 hour.

5) Make the final dough by combining 4 1/2 cups (20.25 ounces) of bread flour, 2 t salt, and 1 1/2 to 1 3/4 cups warm water. Mix the dough with the dough hook for 4 minutes on medium-low speed. Let the dough rest for 10 minutes and then mix again for 4 more minutes. Adjust the water or flour as needed. The dough should be firm but tacky. Transfer the dough to a bowl that has been sprayed with spray oil. Roll the dough around to lightly coat all surfaces.

6) Cover the bowl with plastic wrap and let the dough ferment at room temperature for 3 or 4 hours until it has doubled in size.

7) Shape the dough either into round loaves or into baguettes. If you are making round loaves, you can proof them on parchment lined baking pans that have been lightly dusted with corn meal. If you are making baguettes, you can proof them in a couche. Either way, spray the top of the loaf with spray oil and cover with plastic wrap. Let them proof (ferment) at room temperature for 2 to 3 hours.

8) An hour before baking, preheat the oven to 500 degrees with the baking stone on the bottom rack. On a rack above, put a pan that you will dump water into to create steam.

9) Transfer the dough to a peel dusted with semolina flour or cornmeal. Score the dough and slide onto the baking stone. Pour 1 cup hot water into the steam pan and close the door. After 30 seconds spray the walls with water and close the door. Repeat twice more at 30 second intervals. After the final spray lower the temperature for 450 degrees and bake for 10 minutes. After the 10 minute bake rotate the loaves 180 degrees. Continue baking another 10 to 20 minutes until loaves are golden brown and done. If you measure the temperature of the loaf it should be 205.

10) Let the loaves cool on a wire rack for 45 minutes before slicing.
It was because of this loaf that I discovered the bottom burner of my oven is burnt out! We're getting a new oven soon.

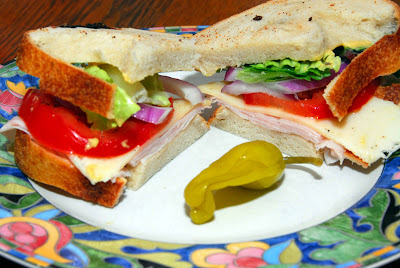
The bread made a great sandwich!

Sourdough Bread

It has been quite a while since I made sourdough bread. The last time I was making it my wife made me throw out the culture because she said it stunk. The other thing that has killed my previous starters was infestation by gnats. Yuck.

I've had 3 good starters in my life. The first was when I lived in Iowa City. I started that one using commercial yeast. It lasted a couple years and then I moved and threw it out. The next starter I had was in Chicago. I got it from this guy. He has a culture that dates back to the gold rush. It was an extremely tasty starter but it eventually got infested by gnats.

The last time I had a starter was in Kansas City. It was a wild yeasted starter (see below). It made the best bread of the three. I think I went on vacation and forgot it on the counter. When I came back it was moldy. Lesson learned - if you aren't going to use your starter for a long time, be sure to freeze it. Don't let it sit at room temperature unless you are actually about to bake bread. Instructions for freezing are included below.

This is a good time of year to start a culture. You can have a nice warm room temperature without too much fuss. I have used Peter Reinhart's system before and it made great bread. You can read about it in my favorite bread book The Bread Baker's Apprentice.

To make a sourdough starter you just need a little time, water, a little rye flour and some unbleached bread flour. You'll also need some sort of container to keep the culture in.

The culture is where the yeast and the lactobacillus for your bread comes from. You don't need any yeast to start a culture. Wild yeast is growing everywhere in the environment. It is especially prominent in rye flour and I suspect that is why Mr. Reinhart uses rye flour in the first step.

Wild Yeasted Sourdough Culture

Day 1

Combine 1 cup rye flour and 3/4 cup water in a bowl. Stir real well and cover. Let it sit on the counter for 24 hours.

Day 2

Nothing much will have changed in your culture overnight. Add 1 cup unbleached flour and 1/2 cup water to the bowl. Stir, cover, and let it sit on the counter again overnight.

Day 3

On day three there will probably be some signs of fermentation like bubbling and a slight rise in the dough. Dump out half of the starter. Add 1 cup unbleached flour and 1/2 cup water. Stir well, cover and let sit on the counter for 24 hours.

Day 4

The dough should have doubled in size by now. If it hasn't, let it sit on the counter for another 12 to 24 hours. Otherwise, dump out half of the culture and add 1 cup unbleached flour and 1/2 cup water. Cover and fement until at least double in size. It may take from 4 to 24 hours.

At this point you can turn your sourdough culture into a barm or mother starter.

Barm

Take 1 cup of the seed culture from above and mix it with 16 oz (2 cups) water and 3 1/2 cups (16 oz) unbleached bread flour. Transfer the mixture to a clean container at least twice the size of the mixture. Cover with plastic wrap and let sit on the counter for about 6 hours until it is bubbly. Put the barm in the fridge overnight. It will be ready to use the next day and remain potent for 3 days.

Refreshing your Barm

You should refresh your barm the day before you plan to use it. Throw out or use half of the barm. You want to double the amount of stuff in the container by adding flour and water. For instance if there is 1 pound of barm left in your container, you refresh it by adding 1 3/4 cups (8 oz) flour and 1 cup (8 oz) water. Basically you need to add equal weights of flour and water to double the barm. Cover the barm and let it sit on the counter for 4 to 6 hours until bubbly. Cover and put in the fridge overnight.

Storing your Barm Long Term

If you are not planning on making any bread for a while you can put the barm in a ziplock bag which has been misted on the inside with spray oil. Put the barm in the freezer. You will have to take it out of the freezer several days in advance of any planned breadmaking. Thaw it out in the refrigerator. Once it is thawed you will have to dump out all but 1/2 cup of the barm and refresh it a couple times as described above.

Sunday, May 18, 2008

Sunday Dinner

Tonight for dinner we had an Indian Feast!
No not that kind....
No not that kind ... (looks like a young Steven Segal doesn't she?)
Lets try again...
Yes that kind!

Booyah! Recipes included below.

Butter Chicken

I made the butter chicken from the youtube video I posted before. I have 2 words for you...deee licious! This is truly one of the most tasty Indian dishes I have ever eaten. I took the video and converted it to text to make it easier for me.

Butter Chicken

Cut up 1 1/2 pounds of chicken and add 1 t red chili powder, 2 t ground coriander and 1 t salt. Heat a skillet over medium heat. When it is good and hot add some oil. Brown the chicken in the oil. Remove the chicken from the oil but leave the oil in the pan.

Add 2 t cumin seeds, 1/2 diced onion, and 2 tablespoons of a 50/50 mix of ground ginger and garlic. Add 1 cup water and deglaze the pan real nice.

Add 2 t coriander powder, 1/4 cup cashew nuts, 1/2 t Indian chili powder, 1 T fenugreek leaves, 1 diced green serano chili and 3 diced tomatoes. Cover and simmer about 20 minutes, until everything is nice and soft.

Cool mixture and then blend until smooth. Heat 4 T butter in a skillet until melted. Return the juice from the chicken to the pan. Add the blended mixture and 1/2 cup water. Add a tiny bit of salt and bring to a simmer. Add a little red food coloring and 1 t sugar. Add a healthy squirt of ketchup. Finally add 1/2 cup cream and the chicken. Simmer until thickened a little. Add cilantro and serve hot.

It was so good even Daisy approved.

Labels:

Curried Turnips

My wife made a tasty Indian Dish tonight. I usually eat my turnips raw dipped in a little salt but these were pretty tasty.

Turnips with fresh coriander and mint

1 lb. turnips
2 T vegetable oil
6 oz. fresh tomatoes, peeled OR substitute canned tomatoes
½ inch cube of fresh ginger, peeled and grated
1 ½ tsp. ground coriander
¼ tsp. ground turmeric
1/8-1/4 tsp cayenne pepper
8 oz. water
1 ½ T finely chopped fresh coriander (cilantro)
1 T very finely chopped fresh mint


Peel the turnips and cut them in half lengthwise. Put the cut ends flat on the cutting board and slice into about 1cm (1/3 inch) thick slices. Place the oil in a wide frying pan and set over medium high heat. When hot, place tomatoes in the pan and fry for about 2 minutes. Add the ginger, ground coriander, turmeric and cayenne. Stir and fry another 2 minutes or until the sauce is thick and paste-like. Add the turnips, water, fresh coriander, mint and salt. Cover, leaving the lid very slightly ajar and cook over medium low heat for 20 minutes. Stir occasionally as the turnips cook. Cover the pan tightly and simmer another 10 minutes or until the turnips are tender. You should be left with a little thick sauce that can be spooned over the turnips.

Samosas

My wife made some delicious samosas tonight. It is probably my favorite Indian Appetizer.

Samosas

Pastry:

4 oz plain flour
¼ tsp. salt
2T vegetable oil, plus a bit more
2 T water

Stuffing:

¾ 1b. potatoes, boiled in their skins and allowed to cool
2 T vegetable oil
½ onion, peeled and finely chopped
3 oz. frozen peas, defrosted
1 ½ T fresh ginger, grated
½ hot green chili, finely chopped
1 ½ T cilantro, finely chopped
1 ½ T water
¾ tsp. salt or to taste
½ tsp. ground coriander
½ tsp. garam masala
½ tsp cumin seeds, roasted and ground
1/8 tsp. cayenne pepper
1 T lemon juice
Vegetable oil for deep frying

Sift the flour and salt into a bowl. Add the vegetable oil and rub it in with your fingers until the mixture resembles coarse breadcrumbs. Slowly add about 2 T water, or a tiny bit more, and form the dough into a stiff ball. Knead for about 10 minutes on a clean work surface or in a mixer. Make a ball. Rub the ball with about ¼ tsp. oil and place in a plastic bag. Set aside for at least 30 minutes.

Prepare the stuffing. Peel the potatoes and cut them into ¼ inch dice. Place 2 T oil in a frying pan and fry the potatoes until they begin to brown around the edges. Add the peas, ginger, chili, cilantro and water. Cover, lower the heat, and simmer until the peas are cooked. Stir occasionally and add water as needed. Add the potatoes, ground coriander, garam masala, salt, roasted cumin seeds, cayenne pepper and lemon juice. Stir to mix. Cook on low heat 3-4 minutes stirring gently. Check the salt and lemon juice for balance and adjust as necessary depending on the amount of broth you want and the taste you like. Turn off the heat and allow to cool.

Knead the pastry again and divide it into 4 balls. Work one at a time, keeping the rest covered. Roll each ball into a 7 inch round. Cut the dough in half and form a cone with one half, making a ¼ inch overlapping seam. Glue seam together with a little water. Fill the cone with about 2 ½ T of the stuffing. Seal the top of the cone with water and flute both edges with a fork or your fingers. Repeat for the rest of the dough.

Heat 1 ½-2 inches oil to 350 degrees. Fry the samosas in the oil until nice and brown.


Labels:

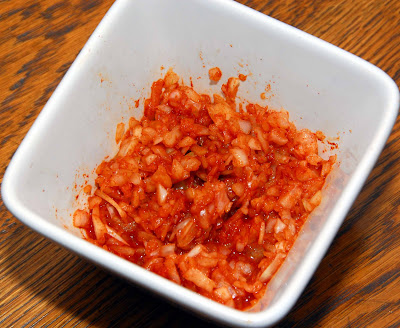
Onion Chutney

If you've eaten at an Indian restaurant I'm sure you've seen this one.

Onion Chutney

1/2 cup onion, diced
4 t lemon juice
3/4 t paprika
1/8 t cayenne
1/2 t salt

Mix everything together.

Labels:

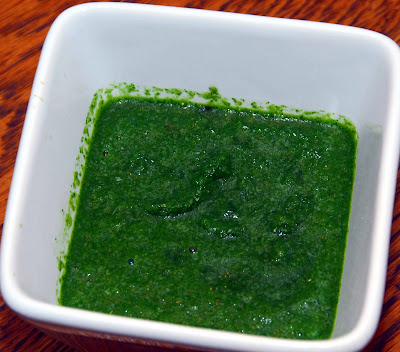
Mint and Cilantro Chutney

One of my favorite chutney recipes is for mint and cilantro chutney. Enjoy.

Cilantro Mint Chutney

  • 1 cup fresh mint
  • 1/2 cup fresh cilantro
  • 1/2 inch piece of ginger root
  • salt to taste
  • 1 green chili
  • 2 tablespoons lime juice
  • 1/2 teaspoon sugar
  • 2 teaspoons coriander powder
  • 2 teaspoons amchoor (mango powder from Indian grocery, or substitute more lime or lemon juice)
  • 1/2 cup onion
  • 1/4-1/2 cup water for blending

Preparation:

1. Clean the mint leaves and cilantro leaves.

2. Add all ingredients except the water together in a blender or

3. Blend/process and add water as you blend to make it the consistency of pancake batter.


Labels:

Channa Masala

I was searching Youtube and found a great video on making channa masala. If you haven't had channa masala a simple description would be Indian Curried chick peas. I watched his video and came up with written instructions on how to make everything.


Channa Masala

Heat some oil in a pan. Add:

3 whole green cardamom pods
1/4 t black cardamom seeds
2 inches of stick cinamon
1 bay leaf
2 cloves
1/4 t mace
1 T cumin seeds

Heat until sizzling. Then add 1 chopped onion and 1 t salt. Cook until onions are well sauteed.

Then add 1 t turmeric
2 T of ground ginger combined with ground garlic (50/50)
cook briefly and then add:

3 chopped tomatoes and 1 green chili. Cook this for a while uncovered, until nice and soft. Now add 1/2 recipe of homemade channa masala powder (see below). Cook on low for a couple minutes.

Add the juice from 2 14 ounce cans of chick peas and cook, uncovered until the sauce is nice and smooth and starting to thicken. At the end, add the chick peas and the juice of 1/2 lime. Cook until the chick peas are nice and heated. Add some cilantro and serve hot.

Labels:

Homemade Channa Masala Powder

One of the recipes I made tonight calls for channa masala powder. It is basically a mix of spices that is used to make the dish channa masala. I got the basic idea from the video on channa masala *see above

Homemade Channa Masala Powder
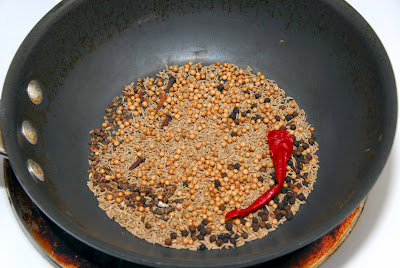
Heat a skillet over medium heat. Add:

1 T coriander seed
2 T cumin seed
1/2 t black cardamom seed
1/4 t green cardamom seed
1 1/2 t black peppercorns
1 dried chili
1/4 t whole cloves

Cook until it starts to release a tiny bit of smoke. The cumin seeds will pop a little bit.
Add the roasted spice to a spice grinder. To these, add:

1 pinch ground ginger
1 pinch mace
1 pinch nutmeg
1/4 t ground cinnamon
1/2 t amchur
1/2 t ground pomegranate seed

Grind up real well.
It makes enough for 2 batches of channa masala.

Labels:

Some Indian Spices

If you are by an Indian Grocer you might pick up a few things. These spices may be very hard to find in the middle of nowhere.

Ground Pomegranate seed is used in a lot of dishes as a way to add sourness. It looks a little to me like owl turds.Indian Chili Powder tastes a lot to me like cayenne pepper.
Fenugreek comes as both the seed form of the plant and the leaf form of the plant. It is a lot like cilantro, which comes as the leaf form (cilantro) and the seed form, coriander.
Amchoor or amchur is ground, dried green mango. It is used to add sourness to dishes.

Saffron Rice, Indian Style

To make saffron rice, I boil 1/4 cup of water and add it to a healthy dose of saffron threads. I let everything sit for a while.
Then I add enough water to make 1/2 cup of liquid. I then make the amount of basmati rice that can be made with 1/2 cup of liquid and set it aside. Then I make a pile of regular white basmati rice. Just before serving I mix in the nice yellow rice with the regular white rice. Viola!

Labels:

Thursday, May 15, 2008

Trick to Beat the Rain

We had some Johnsonville Brats in the fridge today but it is raining horribly out.
I don't know what it is but lately it has rained every other day.
To beat the storms I have been using my broiler, a cookie rack and a cookie sheet.
You just have to set the oven rack down a bit so that the brats sit at the appropriate height under the broiler. You also have to be sure to check the internal temperature with a meat thermometer.

To go with our brats we had Erik's Mom's Beans and Mustard Sauce.
All were pleased!

Butter Chicken

I found a video by an Indian chef on Youtube. He really seems to know what he is doing. I absolutely love Indian food and I am always looking for good recipes. He also has a website that is worth looking at.


Butter chicken is a very popular dish in Indian restaurants in America. It also goes by the name Murgh Mahkni and Chicken Tikka Masala. I have posted on the subject here.
My recipe differs from the video just a little, I use tandoori chicken from the grill instead of chicken pieces sauteed in oil the way he does. I'm definitely going to try his recipe post haste.

Sunday, May 11, 2008

Green Curry with Chicken and Snow Peas

We tried another curry tonight. This one was especially tasty. Even our little one pigged out on it, but she is used to spicy food.

Green Curry with Chicken and Snow Peas

1/4 pound snow peas
1 14 oz can unsweetened coconut milk
3 T green curry paste (use less if you have a sensitive tongue)
1 onion, sliced
1 pound chicken, browned and cut up
1 T brown sugar
1 T brown bean sauce
A small pile of basil leaves, cut up
2 T cilantro, chopped

Dump sugar, coconut milk, curry paste, onion, brown sugar, and bean sauce into a sauce pan. Cover and bring to a simmer. Simmer until onions are soft. Add the cooked chicken and snow peas. Cook until snow peas are just soft. Remove from heat and dump in the herbs. Serve immediately!

Labels:

Honey Curried Thai Chicken Skewers

For a tasty appetizer try some of these.

Honey Curried Thai Chicken Skewers

2 T butter
2 T honey
2 t Dijon mustard
2 t curry powder
a dash of cayenne peper
a dash of salt
1 pound chicken, cut into strips

Dump everything into a bowl and marinate chicken for a while. (2 hours to overnight) Put chicken on skewers and either cook on the grill until done or back in the oven on a cookie sheet at 450 until done.

Labels:

Pad Se Eu

Tonight we had some pad se eu. Out little one got a posse of stuffed animals together to go to the grocery store. Every animal had its own list of things to get. She was trying to save time at the store. Most of them were getting things like honey, jelly, toast, prunes (she likes them) and orange juice.

Pad Se Eu
Kwaytiow Paht Si-Yu

2 T soy sauce with 2 T brown sugar mixed in
1 T black bean sauce
salt and pepper to taste
1 T red curry paste
1 T chopped garlic
About 3 cups broccoli
1/2 pound chicken, very thinly sliced
flat rice noodles (we ended up using fresh fettuccine noodles)
2 eggs

Heat a wok over medium high heat. Add a little oil. Saute the garlic briefly and then add the broccoli. When the broccoli is just starting to soften remove it to a plate. Next stir fry the chicken and remove to the plate. Scramble the eggs and remove to the plate. Finally add the noodles to the wok and dump in all the rest of the ingredients. Stir fry
until heated through.

Labels:

Thursday, May 08, 2008

Mortgages Gone Wild

1997-2001: Chicago - population 9,505,747
2001-2006: Kansas City - population 1,985,429
2006-present: Louisville - population 1,233,735
July 2008: Humboldt - population 4,452

Ha! How about them apples?

I have been planning on moving to Des Moines for some time. I was setting up an office there and making arrangements with hospitals etc. We even found a house to rent. Then the subprime mess hit. I don't own a home so I don't have a subprime mortgage. In fact, I don't have any credit card debt and I drive a cheap used pickup. I have excellent credit. Even so, the banks aren't loaning money right now. I was offered financing for my practice but at interest rates that make the mafia look generous.

At the same time I got an offer to join my father in Fort Dodge. Trinity Regional Hospital has been trying for some time to get a special designation as a "Bariatric Surgery Center of Excellence." The problem has been finding a surgeon qualified and willing to offer backup call for bariatric surgery. Although I am not planning on personally performing bariatric surgery, I am qualified to do so by virtue of the fact that I am a board certified general surgeon. I am going to be the 'back up call' surgeon for bariatrics so that TRH can get is special designation. I don't really have to do that much, just be available for his patients when my father is out of town.

We'll share office space, saving both of us money, and eventually I'll start an office on my own. Its a win for us and a huge win for the hospital. Not only do they get a Plastic and Reconstructive Surgeon on staff, but they can get a center of excellence without having to pay anything for the backup surgeon.

So why Humboldt? We looked for houses for rent in Fort Dodge. There really aren't any houses for rent that meet our needs. To quote a real-estate agent "its a very tight market right now." It just so happens that my grandmother has a perfect house for rent in Humboldt. So there you have it.

Why rent as opposed to buy?
1) The housing market is crashing everywhere, even in small towns. I don't want to buy a house and have it be worth half as much as the mortgage in 3 years.
2) Its been 15 years since I lived in Fort Dodge. I don't really know the neighborhoods anymore. Also, when a few houses foreclose on a given block, what do you suppose happens to the formerly nice neighborhood? Add to that the difficulties with buying a house while living 10 hours away.

Now the purpose for having a food blog and learning to cook all of the delicious foods from all over the world becomes very clear. One of the things I will miss most about the cities I have lived in will be the food. Now I can bring it all with me.

Tuesday, May 06, 2008

Half Marathon Photo

A photographer took a photo of me running at the Half Marathon. I thought it was pretty neat but I'm biased.
Look closely and see the Hawkeye hat!

Monday, May 05, 2008

John Denver meets the concertina

As many of you know, I took up the concertina some time ago. I have been trying to play more modern music on the concertina. Here is someone playing a familiar tune!

Sunday, May 04, 2008

134th Kentucky Derby

DGF is proud to report on the 134th Kentucky Derby. I scoped it out yesterday so that it will be easier to go in the future. I parked about 3 blocks North on 4th street at a place called Chinese Chef.

It only cost me 5 bucks and it was easy to get in and out. Parking even a block closer cost $25.
When I got there I had to stand in line to be frisked. It is a big deal to be able to sneak alcohol into the infield. People have huge elaborate schemes to get stuff inside. It costs like $9 for a can of beer but it is also a tradition. Security has gotten so strict that people have been burying bottles of stuff in the infield a week or so before and digging it up on Derby Day.

I paid $40 to get into the infield. I figured I would be able to watch the races, just from a bad perspective. I was wrong. Every square inch of the sides of the track are covered by temporary suites for companies to have parties. I never saw a horse the entire day. Here is a suite from Fort Dodge. I wonder what that was about.
I arrived at the start of the 3rd race. I walked down the famous tunnel leading to the infield.
It goes underneath the track. Eazy E should remember this tunnel, because we ran through it and through Churchill Downs for the half-marathon. There was an amazing amount of ogling and heckling going on. These poor women had seats right above the exit from the infield and they were wearing skirts.
Notice how they are sitting sideways! A ticket to the infield also allows you to go inside under the bleachers. If you want to see horses you either need a box ($5000) or a ticket to the grandstands ($121). Next time I go I am getting grandstand tickets. With grandstand tickets you can still go out to the infield and everywhere else, but you actually get to see the horses racing.

Out in the infield people set up little tents, chairs and tarps.
An enormous amount of drinking and debauchery goes on, much too indecent for me to write about.

The classier women dress up in nice dresses and special Derby hats.
Men have many options. My favorite is the seersucker suit either with a bow tie or a regular tie.
Another classy look is the linen suit with straw hat.
Yet another popular look is to dress like Robert Redford in the movie The Sting.

There is a very popular type of hat for men. I am not sure what the name of it is but I like the style.
If I were you, I would stay far away from the infield after 3:00PM. By that time people are very drunk. People walk around selling beer. They also walk around selling mint juleps.
The bourbon in the juleps is probably what makes them so mean. People down here call bourbon 'the beast' because they think if you drink a lot of it you become a mean drunk as opposed to drinking a similar amount of beer.

The last time I walked through the infield was 3:00 PM and it was getting weird. I saw 2 fights and everyone was extremely surly. There was also a mud fight.
I spent most of my time by a TV outside the betting windows.
I would place a $2 bet and watch the race.

I bet on Big Brown to show and won $4.80 on my $2 bet.
It was a very enjoyable day!

"If life had taken me in a different direction I might have been stuck in the infield."
- Bo Derek, 5/3/2008

Just for completeness sake, I must inform the readers that I did not drink a single drop of alcohol at the Derby because I did not have a driver.

Labels: