I always try to eat delicious food. Unfortunately I don't have that much money, so I have to cook a lot of it at home. But thats OK because I love cooking and I love eating at home with my wife. This is a website with my favorite recipes and a little bit of commentary.

Wednesday, October 31, 2007

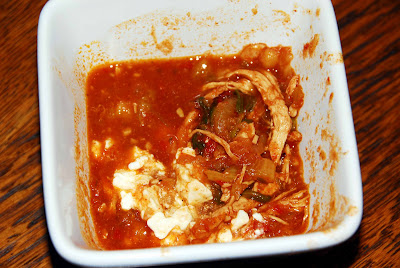
Chicken Pazole Soup

Tonight my wife made an excellent soup. How can you possibly have too many soup recipes? This is an extremely tasty Mexican chicken soup. I especially liked the addition hominy.

This Mexican stew comes from the October, 2003 issue of Cuisine At Home magazine.

Chicken Pozole Chili

For the Chili Sauce-

Combine and sauté:

3 cups chopped tomatoes

2 cups diced yellow onions

8 cascabel chiles (or those of your choice) crushed, stems and seeds removed

6 cloves garlic, smashed

¼ cup olive oil

2 T chopped fresh oregano

½ tsp. kosher salt

(10 minutes)

Add and simmer; puree:

2 6” corn tortillas, chopped

2 cups chicken broth

(20 minutes)

For the Chili-

Sauté in 2T olive oil:

2 cups yellow onion, sliced

Stir in:

1 T garlic, minced

1 T chili powder

2 tsp. cumin

1 tsp. ground coriander

1 tsp. kosher salt

¼ tsp. cayenne pepper

Add and simmer:

3 cups chicken broth

2 cups cooked and shredded chicken breast

2 cups romaine lettuce

*If preparing ahead of time add the lettuce a few minutes before serving

1 can yellow hominy, drained and rinsed - a substitute is canned corn

The chile sauce you prepared above

(10 minutes)

Top with feta cheese and serve. The article also mentions an avocado salad that you can garnish the chili with in addition to the feta cheese.


Halloween 2007

Tonight we went to Hillcrest Avenue between Franfort and Brownsboro. We went trick or treating with the baby. On a 1 block area there were literally 100,000 people. Every house was decorated to the max. There were even some houses with animation!

The baby went trick or treating and then played a trick on us!

Halloween Candies

In honor of Halloween*

Favorite candy bars

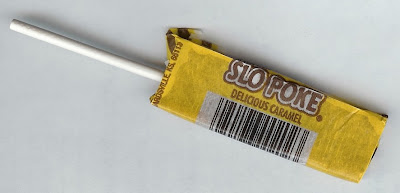
1)Slo-Poke
2) Mars Bar
3) Kit Kat
4) Almond Joy


Slo-Poke's are impossible to find.
In recent years I have only seen them in Ben Franklin stores and occasionally wrapped up like a minature tootsie roll pop in mixed candy bags.

I haven't seen a Mars in many years.
The replacement is a Snicker's Almond which I can attest is identical to a Mar's Bar and thus very satisfying.
Booyah!

I reckon the Kit Kat is a close one.

My friend Gabe and I used to stop at Kwik Shop in Fort Dodge after school and play a game of Double Dragon. We would each get a 16 ounce glass bottle of Mountain Dew and a Kit Kat. Ahhh the simple pleasures in life.

And of course:
I love Almond Joy bars. Probably the only reason I am so attached to them is because my dad really liked them when I was growing up.

Then he found out that coconut oil was bad. Shortly thereafter the whole family got started on the Pritican Diet, which absolutely sucks and has no redeeming qualities.

And last but not least:
Rosebud!!

*I'm not a bad person. I am not a warlock. I just grew up trick or treating.

Monday, October 29, 2007

Tyrolean Hash

There is no better use for left over roast beef than making hash. I'm not trying to take anything away from roast beef sandwiches and the like, but hash is divine. This is yet another recipe from The German Cookbook.
I have modified the recipe just slightly by using diced potatoes instead of sliced potatoes.

Tyrolean "Roast" Hash
Tiroler Geröstel

7 or 8 medium sized potatoes
4 strips bacon
2 onions, minced
3 cups diced, cooked beef
salt and pepper

Boil the potatoes. Allow to cool completely and then dice. Brown the bacon in a cast iron skillet. Remove the bacon from the pan leaving the grease behind. Saute the onion until soft. Add in the beef and saute another few minutes. Add the potatoes, season with salt and pepper and fry slowly. Turn mass over, pancake style, after about 8 to 10 minutes and brown on the second side. Serve the bacon on the side or use it in another dish or give it to a nice dog.

Sunday, October 28, 2007

Finishing your Sauerbraten

By this point you should have some sauerbraten that has marinated for 3 to 5 days. If you need the recipe and instructions for the marinade see part 1 of this series. I got this recipe from The German Cookbook.

Rheinischer Sauerbraten (finished)

1 fully marinated 5 pound rump of beef
4 slices bacon and 2 T butter
2 large onions, sliced
1 bay leaf
6 cloves

1) Remove roast from the marinade and dry really really really well with paper towels.
2) Strain the marinade and save. Discard the solids.
3) melt butter in a Dutch Oven and fry bacon in the butter. Remove the bacon slices to a paper towel.
4) Brown the roast on all sides in the bacon grease and butter. It should take about 15 minutes.
5) Remove roast from pan and set aside.
6) Saute the onions in the butter until soft.
7) Return the roast to the pot and place on top of the onions. Also return the bacon.
8) Fill Dutch oven to halfway up the side of the roast with a mixture of leftover strained marinade and water.

** if you use 100% marinade and no fresh water you will have an extremely strong gravy. That is how German Cookbook. recommends to make it but if I were you I would dilute it. Make a batch with 1 cup marinade and the rest water and see how you like it.

9) Add the bay leaf and cloves.
10) Bring the pot to a boil and then reduce heat to a very very slow simmer.
11) Simmer for 2 to 3 hours.

Preparing the gravy

2 T butter
3 T flour
2 T sugar
lemon juice
1/2 cup golden raisins, soaked in warm water
1 T tomato puree

1) Remove meat from the pan
2) Strain the liquids and throw out the solids.
3) Return the liquid to the Dutch Oven.
4) In a separate saucepan, melt butter, add flour and sugar. Stir on low heat until the sugar turns a deep caramel color.
5) Add the butter/sugar/flour mix to the Dutch oven and stir with a whisk.
6) Squeeze a little lemon juice into the pot.
7) Add the raisins which have been soaked and drained
8) Return the roast to the pot, cover and simmer 10 minutes.
9) If the sauce gets too thick add a little water.

** more likely your sauce will be too thin. To fix that problem ladle out about a cup of the sauce and add a few tablespoons of flour to it. Stir really well and then add back to the pot. The gravy should thicken up. You can repeat that process until the gravy is more to your liking.

10) 5 minutes before serving add the tomato sauce.

To serve, slice the meat and arrange on a heated platter splashed with a little gravy. Serve the rest of the gravy on the side.

Potato Dumplings

Along with Blaukraut, potato dumplings are the traditional accompaniment to sauerbraten. I found this recipe in The German Cookbook.

Cooked Potato Dumplings
Gekochte Kartoffelklössel

2 pounds potatoes, peeled and chopped
1 to 1 1/2 cups flour
2 eggs, beaten
1 t salt
25 to 30 croutons

Cook, peel and mash potatoes and refrigerate until needed. Mix 1 cup flour, eggs and salt and add to the potatoes. Add flour a little at a time until it forms a smooth dough. Kneed dough until smooth. Shape into dumplings with floured hands, placing a few croutons in the center of each dumpling.

To cook, bring water to a boil. Drop dumplings in a few at a time and cook about 10 minutes at a simmer.

Note: You want to take these straight from the cooking pot to the table so save the actual boiling step until you are about 10 minutes from eating.

German Red Cabbage

A traditional accompaniment to sauerbraten is red cabbage or blaukraut. Blau is German for blue, even though it is made with red cabbage. At the end of cooking the cabbage should be deep bluish purple. We got this recipe from The German Cookbook. My wife made this portion of the meal.

German Red Cabbage

1 head read cabbage

1 onion, minced

1 apple, chopped

2-3 T butter OR bacon fat

1 T sugar

4 T white or wine vinegar

1 cup water

Salt to taste

1/4 cup red currant jelly


Melt fat in a large enameled dutch oven or other large cooking pot with a lid. Add sugar and stir until golden brown. Lower heat and add the onion and apple. Stir well, cover and simmer 3-4 minutes. Meanwhile, clean and shred the cabbage. Add cabbage to the pot and stir very well to ensure the fat coats all of the cabbage. This is very important or the cabbage will turn out mushy and pinkish in color. Cover and braise over low heat for about 10 minutes or until the cabbage appears bright purple or bluish in color. Add the vinegar, salt and pepper and braise 1 ½ to 2 hours more or until tender. At the end of cooking stir in the 1/4 cup currant jelly. Best if prepared the day before.

Friday, October 26, 2007

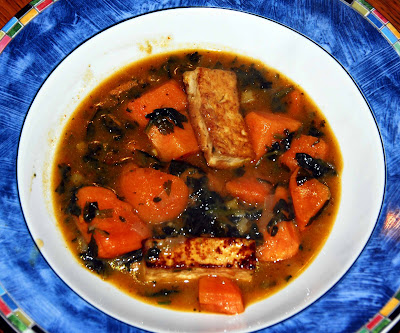
Thai Sweet Potato Soup

I had a delicious soup at a Thai restaurant in Louisville. The problem is I forgot which one! I have been craving the soup lately so I decided to take a crack at it. The only ingredients which might be harder to find in the boonies are the curry pastes and the coconut milk. I have been pleasantly surprised by the increasing availability of Thai and Indian ingredients in most grocery stores. You should at least be able to find the coconut milk. Just remember that coconut milk is different from coconut cream. Coconut cream is sweet and you put it in pina coladas.


Coconut milk is not really sweet at all. If you can't find ready made Thai curry pastes there are loads of recipes all over the internet that are made from easy to find ingredients.


Thai Sweet Potato Soup


2 sweet potatoes, peeled and cut into chunks
Tofu, fried, or pieces of chicken, browned
1/2 cup diced shallots
3 cloves garlic, crushed
2 inch piece of ginger, finely chopped
olive oil
Two 14 oz cans coconut milk
a 14 oz can chicken broth
1 T red Thai curry paste (add more if you want a hotter soup)
1 T green Thai curry paste (add more if you want a hotter soup)
1/2 cup fresh or frozen spinach
2 T soy sauce
a few T finely chopped cilantro

Heat olive oil in a soup pot. Saute the shallots, ginger and garlic for a couple minutes until starting to soften. Add all of the rest of the ingredients except the spinach cilantro. Bring to a boil, cover, reduce heat and simmer for about 20 minutes until the sweet potatoes are soft. Add the spinach and cook until heated through. Remove the pot from heat and stir in the cilantro. Soup should be served with some rice or noodles on the side in case people want to mix it in.

Some people don't like tofu. I didn't either until I ate it fried a bit to give it some texture.
I added just a little bit too much spinach to this batch so mine is a little greener than you want.


Labels:

Wednesday, October 24, 2007

Project Sauerbraten

Ever since we ate at Gasthaus I have been craving sauerbraten. Whenever I get cravings for a certain food I know that I must learn the recipe.

Sauerbraten has quite a history. It is traditionally made from horse meat but I think I'll substitute beef.

It depends on the part of Germany but sauerbraten is usually meat marinated in a vinegar and spice mix for three to five days. The sauerbraten served at Gasthaus is marinated for a week.

I finally found a good german cookbook. Strangely enough it is called The German Cookbook. This particular recipe is from the Rhineland and is a little sweeter. The only ingredient that might be somewhat confusing is the pickling spice. I think pretty much every grocery store will have this somewhere. If not you can always make your own. A google search reveals a lot of options.

Rheinischer Sauerbraten

Marinating the beef:

5 pound rump roast
bacon grease
salt
3 cups white vinegar
3 cups water
1 onion, sliced
2 bay leaves
8 cloves
8 peppercorns
1 T pickling spices
1 carrot, shredded

Take the roast and rub it down with bacon grease and sprinkle with salt. Place in a bowl. Combine the rest of the ingredients in a saucepan and bring to a boil. Reduce heat and simmer 5 minutes. Cool to room temperature and pour over the beef. The marinade should completely cover the beef. If it doesn't then add equal amounts of vinegar and water until the beef is completely covered. Cover the bowl tightly and marinate for 3 to 5 days in the fridge. Turn the meat twice a day while it is marinating. I will include the instructions for baking and gravy in the next post.

Moonshine

Ever since we moved to Kentucky I have been collecting information and stories about moonshine. Unless you have lived here you won't believe me when I tell you that everyone, yes everyone down here has someone in their family who makes moonshine. Everyone has a family recipe and method for making moonshine. I have met numerous people who actually make their own moonshine and use family recipes dating back beyond memory. A lot of people have stills that were handed down through the generations.


When you talk to someone about moonshine the first thing they are going to do is deny any knowledge of it. They've never met anyone who makes it. I've heard it all before. Eventually people open up and its all they want to talk about. Moonshine is a huge part of the culture and once people know that you are not passing judgment and even appreciate the art form they'll open up to you.

So anyway I was talking to one of my medical students about his family recipe. He grew up in Eastern Kentucky and he has been around moonshine his whole life. I am currently spending every possible hour in the operating room picking his brain. I am, of course, sworn to secrecy about the actual recipe and methods but I can reveal a couple things about how moonshine is consumed in Eastern Kentucky.

He says that a very common way to consume moonshine is to mix it in varying amounts with Ale-8-1.

It is a ginger soft drink bottled in Eastern Kentucky. You can read all about it on their website.

Another common way is to get a can of cheap fruit punch and mix it.

Tuesday, October 23, 2007

Hot pepper scheme

I recently came into possession of a pod of the world's new hottest pepper - Bhut Jolokia.
It has displaced the previous record holder the Red Savina. I grew some Red Savinas under the name Caribbean Red Hot.

Readers may remember that I pickled a bunch of those and fed one to my friend W under the guise that it was a pickled cherry pepper. The effects were amazing! I am sure that he will remember the pepper featured in the photo above. I ate one and the experience hasn't left me.

Right now bhut jolokias go for $10 a pod! I guess they are extremely rare at the moment, having been recently discovered.

One thing to remember about my single pod above is that it is loaded with seeds. I will have bhut jolokia growing in my garden next year.

Ledyard Update

I recently came into possession of a Ledyard Centennial belt buckle!
It needs a little Brasso but I think it will shape up nicely.

Apple Butter

My naughty cousin from South Dakota wrote me a while ago to remind me that it is time to put up some apple butter.

Some readers may remember that I have quite a history with apple butter. When I was a kid I used to visit my grandparents' farm up by Livermore Iowa.

Every once in a while it would rain and I couldn't go outside, or I would run out of ammo for my BB gun. My grandmother had these crazy books cataloging Hillbilly life called Foxfire. The books were part of an anthropology project to record the methods and lives of mountain people. I used to read the books because every once in a while they would have some crazy project for me to work on. Anyway when I was in medical school I unearthed a Foxfire book and found an article on apple butter.

To make a long story short, I shopped around for a huge witch's kettle and I was going to make a stirring stick like they described in Foxfire.
The traditional way to make apple butter is outside in a huge kettle over an open fire. Unfortunately I couldn't locate a Witch's kettle and these were the days before I had outdoor Dutch Ovens. You need the big stick because at a certain point the apple butter splatters when it is boiling. It will burn the crap out of you if it gets on your skin. Hot sugar = ouch! Unfortunately I couldn't locate a Witch's kettle and these were the days before I had outdoor Dutch ovens. Instead I destroyed a kitchen. Although the mess was huge, the apple butter was extraordinary. You can't buy apple butter as good as you can make at home.

Small Batch of Apple Butter

3 pounds granny Smith apples (about 8)
3 cups apple cider
1 1/2 cups brown sugar
2 t cinnamon
1/2 t ground cloves
1/2 t allspice

Peel and core the apples. Put into a Dutch oven with the cider. Bring to a boil, cover and simmer for 1/2 hour.
At the end of this step the apples will be very soft. Strain the apples.
Return the strained sauce to the pan and add the remainder of the ingredients. Bring to a boil, reduce heat and simmer, uncovered for about 2 hours until the apple butter thickens to the right consistency.
If you make a small batch like this you can put it into small jars and refrigerate it. No need to can!
You will use this amount of apple butter long before it goes bad in the fridge.

Pickle Loaf

When I was a general surgery resident we rotated through a VA hospital. Every day for lunch the cafeteria put a brown bag in the fridge in our office. Usually there was a sandwich, an apple and some sort of carbohydrate like chips. For the first few years I never touched the sandwiches. They looked radioactive to me.

One day a medical student started rotating with us named Wes. I started calling him mess because he was always disheveled and late. Anyway every single day he raided our fridge and ate all the pickle loaf sandwiches.
He absolutely loved them for some reason. So after a few weeks of this I got curious and tried one. It was only marginally tasty, but it reminded me of when I lived in Temple Texas and my mom used to bring a pickle loaf sandwich and an apple out to my treehouse with a glass of Tang.

Pickle loaf is pretty good in very small doses. The key to a good pickle loaf sandwich is to use at most 2 slices of pickle loaf. Also you should load the sandwich up with lettuce, tomato, cheese and whatever else you can think of. I like a little bit of Dijon and some Ranch dressing on mine.
If you are making these for my friend Easy E, be sure to slice them on the diagonal, as above.

Labels:

Friday, October 19, 2007

Chop Suey!

I have been doing research on the venerated American dish chop suey.


The first time I ever had chop suey was for Christmas Eve dinner at my maternal grandmother's house. I remember the dish as being a slow cooked brown pork dish with soy sauce and Chinese vegetables. She served it with a choice of white rice and those crispy fried noodles. I am currently searching for that recipe.

A detailed history of chop suey can be found here. Here are the important tidbits:
Legend has it that, while he was visiting New York City, Chinese ambassador Li
Hung Chang's cooks invented the dish for his American guests at a dinner on
August 29, 1896. Composed of celery, bean sprouts, and meat in a tasty sauce,
the dish was supposedly created to satisfy both Chinese and American tastes.After 1896, Americans began to visit Chinese restaurants in large numbers for the first time. A chop suey fad swept big cities such as New York and San Francisco. Questioning the origins of the chop suey story, scholars suspect restaurant owners used the popular ambassador's name to inspire interest in a Chinese dish adapted for Americans.
Interestingly, chop suey made an appearance or two in the television series Deadwood.

I have been doing a little research on chop suey recipes. The one that sounds closest to what I used to eat on Christmas eve comes from the Woolworth's lunch counter. Apparently Woolworth's used to serve chop suey back in the 1950's. The recipe is designed for a pressure cooker. I have a pressure cooker but it is on loan to my friend in Kansas City. Instead of using a pressure cooker you could just slow cook the meat. The only reason Woolworth's used a pressure cooker was to get the slow cooked taste without having to start it at 4 in the morning. The pressure cooker was like the microwave of the 1950's.


I found another interesting recipe on the Food Network website. I like the variety of vegies featured in the Food Network Recipe.


Another excellent source for just about any recipe is Gourmet Magazine. I found a recipe in the


Gourmet Magazine, March 2002 issue. The Gourmet Magazine recipe seems to be more of a stir fry than a slow cooked recipe.

One of the more interesting things I found in my research is chop suey sandwiches. Aparently it is all the rage in a small town somewhere on the east coast.

I decided to try the Woolworth's recipe first. I modified it a little bit by adding ginger and garlic. At the end I added in some green onions.

Woolworth's Chop Suey (Improved)

1 1/2 pounds of pork, cut into cubes and dredged in flour
1 T oil
1 onion, diced
3 cups celery, chopped
3 T soy sauce
2 T molasses
1 t salt
1 t pepper
2 cloves garlic, pressed
1 T chopped ginger
8 oz canned mushrooms
14 oz Chinese mixed vegies (see photo below)
1 bunch green onions

Brown the pork in the oil. Add in the onions and celery. I know 3 cups of celery sounds like a lot but seriously, add in the 3 cups celery. Pour just the liquid from the mushrooms and the vegies, saving the actual mushrooms and vegies for later. Add the soy sauce, molasses, salt, pepper, garlic and ginger.


Bring to a boil, reduce heat to simmer and cover. Simmer, stirring occasionally for about an hour and a half until the pork is nice and soft. Add in the mushrooms, Chinese vegies and green onions.


Cook until the everything is heated back up - about 5 minutes. To serve, lay down a layer of chow mien noodles, a layer of rice and some of the chop suey. Sprinkle with sesame seeds.

Labels:

Monday, October 08, 2007

Wig and Pen Pizza

I have been secretly working on a home version of the pizza served at Wig and Pen in Iowa City. I'm going to make a shocking and perhaps blasphemous pronouncement. The second best deep dish pizza is not served in Chicago. It is served at the Wig and Pen in Iowa City, Iowa. The crown, of course, goes to Gino's East.

The Wig and Pen serves a totally different kind of deep dish than Gino's. Wig and Pen serves a stuffed crust pizza. A similar style can be found at Giordano's in Chicago. I've heard through the rumor mill that the original owner of the Wig and Pen did some time at Giordano's before opening his place in Iowa City.

I've been working on my Wig and Pen recipe almost as long as I've been working on my Gino's recipe. We first ate Wig and Pen in 1993 after a football game with my friend Marky Mark F. He is a Chicago native and found Wig and Pen by happenstance. Soon after I was a secret regular at Wig and Pen.

I didn't have to go to near the trouble figuring out Wig and Pen that I did for Gino's. There wasn't any bribing of waiters for pepperoni suppliers. There wasn't any digging through dumpsters to figure out ingredients etc. I learned a lot about pizza from tinkering with my Gino's clone and most of how I figured out Wig and Pen comes from that experience. I am now finally happy enough with my Wig and Pen style pizza to post the recipe and instructions. As with my Gino's recreation, this isn't meant to be a clone of Wig and Pen, but an improved version that you can make at home.

My Wig and Pen Style Pizza

Makes enough dough for a 9 or 10 inch cake pan - enough for 2 people.

2 1/2 cups all purpose flour
1/2 package yeast
3/4 T brown sugar
1 1/2 t salt
1/4 cup corn oil
2 T olive oil
1/2 T sesame oil
3/4 cup warm water

For the brushing of the pan and the crust: 1 T butter, melted and mixed with 1 T olive oil

Dough
Combine the water, yeast and brown sugar in a big bowl. Let sit until the mixture bubbles up. Add in the flour, salt and oils. Stir with a spoon until well combined in a ball. Kneed by hand for 2 minutes. Like pancakes, you don't want this to be perfect. A little lumpy is what you are going for. Cover with plastic wrap and let rise until doubled in size. Punch the dough down and let rise again until doubled in size.

Making the Pizza
Butter the bottom of a 9 or 10 inch cake pan with the mixture of butter and olive oil.

Take 2/3 of the dough and roll it out thin - between an eighth and a quarter of an inch thick. Press the dough into the cake pan so that it is covering the sides. It is OK if the dough spills over the sides, you'll trim things up later. You'll need to decide about what kind of cheese you are going to use. I like to use a combination of fresh mozzarella, Kraft shredded part-skim mozzarella and a touch of grated Romano cheese. Shown here is the crust with some fresh mozzarella.
Next add in the rest of the shredded cheeses.

Add whatever toppings you desire. Please no fruits and vegies - this ain't California.
Roll out the remaining 1/3 of the dough into a round circle. Roll this out thinner than the bottom crust. Drape the dough over the top of the pan and press down inside. It is OK if the dough overlaps the top of the pan. Press it down onto the toppings a little, trying to get the air out. Poke holes in the top of the crust with a knife.
Run a sharp knife around the inside of the pan, leaving a lip of crust at the top. Brush the dough with the remaining butter/olive oil mixture.
The sauce you should use is 1 can of 6 in 1 brand tomatoes mixed with 1 T salt.
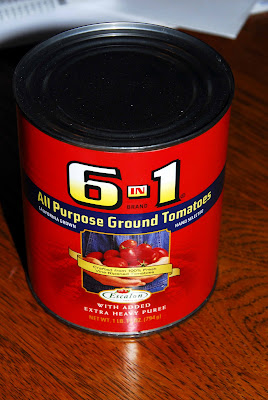
Spread the sauce out on top of the crust. Don't use too much! You don't want a soggy pizza. Use just enough to cover the crust evenly. Save the extra sauce for dipping or to use in another dish. Sprinkle the top with a pinch of oregano and some Parmesan.
If you were smart, you were preheating your oven to 450 for a half hour to an hour. You want one rack on the second to the top rung and the other somewhere below. If you have a baking stone, put it on the bottom rack. It won't be used to bake your pizza but I find that having a big chunk of hot stone down there makes the pizza cook more evenly. Bake the pizza for 10 minutes. Open the door and use a knife to poke a holes in the areas of the crust that are bubbling up.
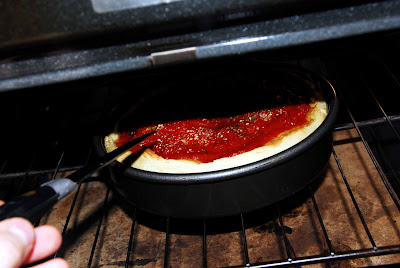
After you poke the holes, rotate the pan 1/2 turn and close the door. Bake 10 more minutes at 450 and repoke, rerotate. Lower the heat to 350 and bake 10 more minutes and check the pizza. If the pizza looks done take it out and let it cool 7 minutes before slicing. You may need to adjust the baking time depending on your oven. Just so there is no confusion, the baking is summarized as follows:

Bake 10 minutes at 450, poke the bubbles and rotate
Bake 10 more minutes at 450, poke the bubbles and rotate
bake 10 minutes at 350 and check. If it isn't done bake it some more.

Here is what a "done" pizza looks like.
If you are a tame reader and you can't handle images of delicious and tempting food I urge you not to read on. I am sure there are several laws against pizza as tasty as you will see in the next photo. If you want to play it safe I suggest you close your browser now. If you are ready to accept the pizza challenge, see below.


Seriously people, looking at photos of pizza this tasty might get you thrown in jail in places like Alabama and Texas.

Still reading??


OK you were warned!


One more time in slow motion: